In this section, I will cover probably the most controversial tool, repeating macros. This is where you can have the Belkin software repeatedly issue a set of keystrokes at predefined intervals. This is something you probably want to save only for single player or custom games, as it may be seen as an unfair advantage on Ladder.
Now it may seem like a good idea to have rotating macros for each building, but I can tell you right off that this is a terrible idea. If you have too many macros going off automatically very frequently, it gets too distracting and you cannot control your troops. So I have one repeating macro at a time, maximum. If I decide I need more things built, then I cancel that macro, and activate another one that builds more troops all at the same time. The last thing you want is a bunch of staggered macros interrupting you constantly.
As of this writing, I actually have very few different macros, but I am thinking of developing more. I keep my repeating macros under my Red Shift (pad down):
Here is an example of a repeating macro:
What this macro does is builds 2 SCVs (accounting for possibly an Orbital and a Planetary being in same group) and 4 marines. As you can see, the recording goes: "0 s {tab} s 7 a a a a 1". The command center/orbital/planetary is group 0, and barracks are group 7. I put a 1 on the end to give me back control of group 1, which is probably what I am moving around on the map with. I have the macro go off every 30 seconds, which is actually more time than is required to build these units. So I am not relying 100% on the macro for early troop/SCV production, but rather as a supplementary crutch. I prefer the macro goes off fewer times than more times, as it is interruptive to play, but if in the frenzy of battle I totally forget about production, at least some stuff still gets made.
When I reach a point in the game where this macro is insufficient, I will cancel this macro (I bind the wheel down on the n52 to be Cancel Macro) and I activate another one, say that builds 2 SCVs, 8 marines, 2 marauders and a tank. There are plenty of keys on the Red Shift, so there is room for a plethora of different macros for most situations.
Starcraft 2 Keyboard Mechanics
This blog details my efforts to maximize my actions per physical keystroke in Starcraft 2 using a Belkin n52 gamepad and a simple 5 button mouse with forward and side to side tilit. I play as Terran, so these tools are customized from a Terran perspective, but I believe they can be adapted easily to any race. Some of these are a little controversial, so be careful when using!
Tuesday, March 22, 2011
Configuring the Belkin n52 for Starcraft 2 (Part 2)
In this section, I will cover my Blue Shift mode, pictured below. The Shift is triggered via Directional Pad Up.
This mode basically allows me to assign buildings and units to groups. Note that for 1 through 4, the keys match the normal mode counterparts for the sake of consistency. I use 7,8,9, and 0 for Barracks, Factories, Starports, and Command Centers, respectively, though it probably does not matter what they are for the sake of this tutorial. I added a special button for Shift 0, as I will often need to add Command Centers to the Command Centers Group, while for the other buildings, a doubleclick is usually enough to get all the buildings of that type, and if not, holding down shift is usually sufficient.
Again, I left the Shift and Ctrl keys unassigned to avoid unintended consequences.
Configuring the Belkin n52 for Starcraft 2 (Part 1)
In this article, I will discuss my basic layout for controlling Terran in Starcraft 2 using the Belkin n52. I will cover some simple macros, but nothing that repeats or autobuilds for you.
First off, here is the device I am referring to. This is actually the older model, which I use, but my understanding is the software works very similarly for the newer blue/black models.
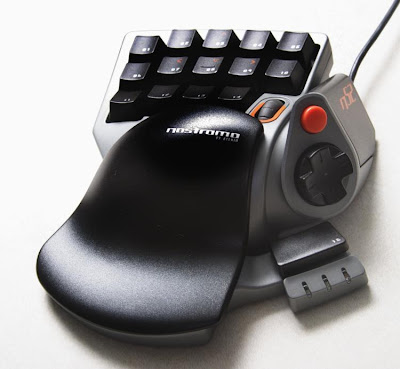
I believe this device is superior to a normal keyboard for three reasons. First, it is more comfortable, as it provides a wrist rest. Second, it can be configured so that no key is farther away than one space from your normal resting hand position, meaning that with only modest practice, you can easily get to the point where you never need to look down at your keys, which is essential to macro becoming second hand to you. To play Starcraft 2 at higher levels, issuing build commands while controlling your troops, never pausing to look back at your base or look down at your hands, must become as natural as breathing, and this device makes it so much easier to get to that level than a standard keyboard. Lastly, the n52 gives your thumb something else to do than simply hit the space bar, which is a pretty big deal, as you will see.
The one way I use this device that is a little different from the way most people use it is that I do not use the directional pad for any kind of scrolling. I use the pad for modifier keys. The Belkin comes built in with 3 modifier shifts built in (it calles them Red, Green and Blue Shifts). These Shifts allow the user to assign up to 4 different sets of keystrokes or macros to a single key (one default, and one for each of the 3 Shifts). So I use three directions for the built-in Shifts, and the fourth direction for Alt, which acts as a modifier shift of its own for my mouse (as discussed in the previous article).
I have my normal mode shown below:
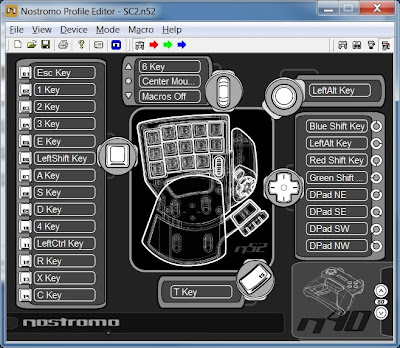
The way I play, I mostly use just 4 different hotkeys for my troops, so my normal mode only has hotkeys for 1 through 4, assigned as shown.
I moved the shift key over to where Caps Lock would be, as it is easier to hit, and left Ctrl just below it, though honestly with all the macros available you will not need to use Ctrl too much, but it is there if I need it.
I kept A, S, D, X and C where they normally would be, as these are very useful keys, and I put E and R where I could fit them, as these get a lot of use as well.
I put T on the spacebar key (below the directional pad). Somehow, stimming with the spacebar is satisfying. I know that the spacebar is used to quickly move to the most recently attacked area, but I seem to have little luck in doing that quickly enough, so I am using the spacebar for something else.
You can see that I put Green shift as Directional Pad Left. This is actually the easiest Shift to hit, as your thumb is most naturally designed to move towards the hand. Note that there are two types of Shifts that can be assigned - Momentary and Toggle. I use Momentary, meaning the Shift is only active while the Shift key is pressed.
My Green Shift Mode is my Starcraft 2 "macro" mode, meaning this is where I issue commands to buildings to build units. It currently looks like this:
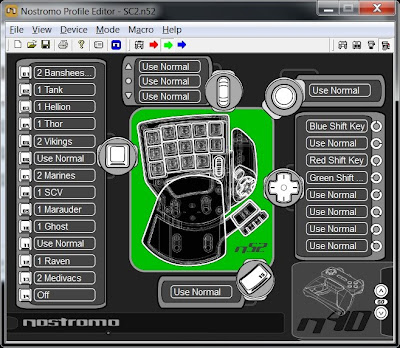
All of these commands are actually n52 macros. Here is an example of what my order is to build 2 Banshees:
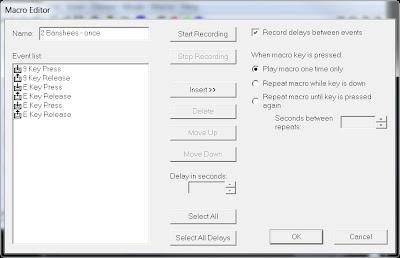
I simply hit Start Recording (unchecking the option to record delays), and started of with 9 (I always bind Starports to 9), and hit E twice.
The other macros you see are pretty self explanatory. I tried to put the most common ones for me in the middle (being SCVs, marines, marauders). So in the early game, to make additional troops, literally all I need to do is hold down left-pad, and strum my build macro keys. Tanks and hellions are just above them, so those are very easy to hit as well.
I found it is helpful to leave the keys for Shift and Ctrl unmodified, as you sometimes end up keeping those pressed longer than you need, and if you enter a Shift state while those are held, you can have undesired results.
In the next article I will cover the Blue and Red shifts, which I use for some of the other hotkeys, building construction, and repeating macros.
X-Mouse Button Control
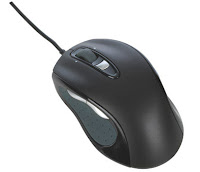
I will start off by discussing my mouse setup. I use a common 5 button mouse, the kind with the scroll wheel/button, with side to side tilt, and two side buttons. It is pictured below:
The tool that allows me to assign custom keystrokes to this mouse is called the X-Mouse Button Control. It can be downloaded here.
Configuring the software is very simple, but can be made to be very powerful with use of Layers. First off, you need to assign a configuration to sc2.exe by clicking Add and choosing a running application (Starcraft 2 must be running).
Next, we configure the Layers. I only use two layers, the default, and one additional, activated by holding down Alt (do not worry about the awkward position of the Alt key, if you follow my guide on setting up the Belkin n52, this will be easily done with your thumb). Modifier keys can be assigned to each layer by going to Settings, Modifier Keys.
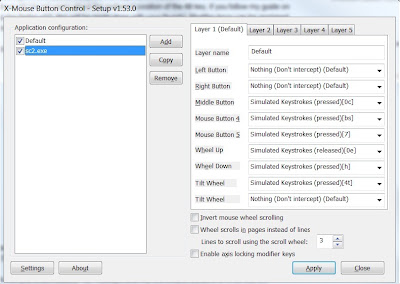
My default layer is below:
As you can see, I assigned custom keystrokes to everything but the standard right and left buttons. Some explanations.
Middle Button (the wheel button): "0c" I always bind my Command Centers to 0, so this will perform a scan. So to quickly scan an area, all I do is click Middle Button and then Left Button.
Mouse Button 4 (typically the "back" button in for your browser): "bs" This will quickly build a supply depot, assuming you have an SCV selected. I am considering adding a hotkey in front of it, which save me from having to click on an SCV first, assuming the SCV is already hotkeyed.
Mouse Button 5 (typically the "forward" button for your browser): "7" I always bind all my Barracks to 7, so this is useful to me in early rushes, so I can set a waypoint for my barracks or just check on them using my mouse only.
Wheel up: "e0" This drops a mule. I can hold the shift key and click multiple times for multiple mules after the initial one.
Wheel down: "h" This issues a hold command. Somehow rolling the wheel back is logical for this.
Tilt wheel: "4t" I have been using Ravens more lately, so this may be a temporary thing. I bind my Ravens to 4, and using this tilt wheel I can lay down an autoturret quickly.
I do not like to use the other tilt, as it feels unnatural to tilt my middle finger to the right, but it is easy to curve it in a little and tilt to the left.
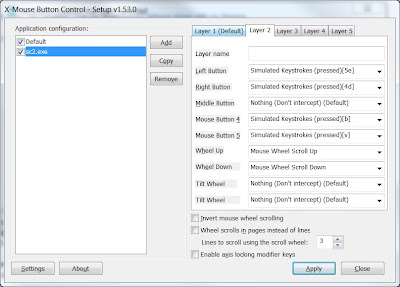
Now, on to Layer 2:
Left Button: "5e" This will have my ghosts fire an EMP round, assuming Ghosts are bound to 5. So all that is needed during the heat of battle for me to fire the EMPs is to hold down Alt with my thumb, left click, let go of alt, and left click again on target.
Right Button: "4d" This will order my Raven to put down a PDD.
Mouse Button 4: "b" This issues a Build command, assuming I have an SCV selected.
Mouse Button 5: "v" This issues an Advanced Build command, assuming I have an SCV selected.
Notice that I explicitly put Mouse Scroll Up and Down back on the wheel. This is so that if I do wish to zoom in and out, I still can.
I am sure you can think of additional functions for Layer 3 if you need it (Shift Alt would be a logical modifier for this), and as I develop my mechanics I will no doubt add some as well, but this is just to give you the idea.
Subscribe to:
Posts (Atom)